Showing posts with label toys. Show all posts

Friday, July 22, 2016

Bridges and Blocks, Part 4 - Kenner Girder and Panel

Once again my dad roped me into giving a presentation for the Capital Miniature Auto Collectors Club (you can read about my other adventures with the CMACC here). At their monthly meetings, the rotating host is expected to come up with a theme. Members who have things that tie in with the theme bring them and present them, providing background information about the items.
This July the subject was building sets and roadways. The group is focused around the appreciation and collection of toy cars and car models, so the idea was to present building sets and roadways that were (or could have been) used with toy cars.


Some of the members brought some of the same sets they did last time (see: Kenner Sky Rail Project, Part 10). I however, chose to focus on a couple of vintage roadway sets. One very well-known, one quite obscure. Below are some of the set other members brought.


Kenner Girder and Panel

The "girder and panel" building by Kenner first hit the market in 1957 -- and after passing thruogh several hands -- is still being sold today by Bridge Street. The last time I talked at the CMACC, I showcased the Kenner building sets (see: Kenner Skyrail Project 7). This time I presented an example of the roadway sets. Kenner offered their "Bridge and Turnpike" sets from 1958 through 1960.


Since the girders were uniform in both the roadway and building sets, you could mix and patch them to build all kinds of structures -- in fact, the 1960 sets were a combination of the two.


We only had a limited amount of time to set up the displays, and the Playskool Teach-A-Tot Road System (see Part 3), took up most of it. Nevertheless I did manage a representative suspension bridge. I owned the No. 4 Bridge and Turnpike set. I used the pieces from that set to construct the display.

The traffic were vehicles from my Matchbox car collection -- all of them I've owned since I was a boy. Yes, they really are in near-mint condition -- I knew how to play nicely with my toys!


Wednesday, July 20, 2016

Bridges and Blocks, Part 2 - A Paper Mystery

Once again my dad roped me into giving a presentation for the Capital Miniature Auto Collectors Club (you can read about my other adventures with the CMACC here). At their monthly meetings, the rotating host is expected to come up with a theme. Members who have things that tie in with the theme bring them and present them, providing background information about the items.
This July the subject was building sets and roadways. The group is focused around the appreciation and collection of toy cars and car models, so the idea was to present building sets and roadways that were (or could have been) used with toy cars.


Some of the members brought some of the same sets they did last time (see: Kenner Sky Rail Project, Part 10). I however, chose to focus on a couple of vintage roadway sets. One very well-known, one quite obscure. Below are some of the set other members brought.


A Paper Mystery

One member brought in a building set that was absolutely fascinating. It has no manufacturer listed, no trade mark, no clue as to who made it. Or indeed, why. The set is a paper village that mailed in a flat over-sized envelope. Inside was a base, and several buildings that unfolded into shape. 


Even with no hard information, it's possible to make some educated guesses about this piece.

First, the style of the artwork and the color palette suggest this was made in the 1920s, or possibly the very early 1930s. 


Personally, I lean towards the 1920s. I think a 1930s set would have more streamlined and Art Deco-style buildings. 


Also, the lettering -- particularly on the garage (above) seems more 1920s. Even in the early 1930s, san serif was preferred as it looked newer and more streamlined.


I think that it might possibly be a premium of some kind. Since it was shipped in a envelope, and designed to be shipped in an envelope, I think it unlikely that this village was sold in retail stores. Either it was something you had to purchase through the mail, or perhaps send for with your collection of labels or box tops. 

While we don't know a lot about it, this paper village made an interesting display. And I could imagine some youngster almost 80 years ago on the floor pushing his Tootsietoy Grahams through the streets of this brightly-colored town. 


Tuesday, July 19, 2016

Bridges and Blocks, Part 1 - Anchor Stone, Bilt EZ, Block City

Once again my dad roped me into giving a presentation for the Capital Miniature Auto Collectors Club (you can read about my other adventures with the CMACC here). At their monthly meetings, the rotating host is expected to come up with a theme. Members who have things that tie in with the theme bring them and present them, providing background information about the items.
This July the subject was building sets and roadways. The group is focused around the appreciation and collection of toy cars and car models, so the idea was to present building sets and roadways that were (or could have been) used with toy cars.


Some of the members brought some of the same sets they did last time (see: Kenner Sky Rail Project, Part 10). I however, chose to focus on a couple of vintage roadway sets. One very well-known, one quite obscure. Below are some of the set other members brought.


Anchor Stone Blocks

Anchor Stone Blocks were introduced in the 1880's and are still in production today Anchor Stone Blocks were always a high-end toy, and can be found at boutique toy stores and toy websites.

The pieces were made from limestone, sand, and linseed oil, simulating brick, marble, and concrete blocks. The set brought to the meeting was made around 1890-1900 and included metal parts for the bridge construction.


Bilt EZ

In the 1920's, the Scott Manufacturing Company of Chicago, Il. came out with the Bilt EZ metal construction sets. The inspiration for Bilt EZ was the skyline of Chicago itself. The sets consisted of metal wall panels connected by tabbed metal floor plates. The metal is quite thin, and the tabs require some forcing to lock in place. As a result, the panels can be warped easily. 

The owner explained that he's quite cautious about using this set, and I understand why. I've had the same trouble with the Line Mar Vest Pocket Builder. I very quickly discovered that I had to be very gentle with the metal pieces if I wanted them to last to the end of the project.


>

Block City

We were fortunate to have examples from all phases of Tri-State Plastic Molding's Block City. The earliest version, which pre-dated Lego, had plastic blocks that just sort of sat atop one another. The round keys helped as guides, but they didn't lock the bricks together.


A later iteration used square keys on the top of the bricks, which helped them snap into place -- and make taller structures possible.  The name was also changed from Block City to Brick Town.


The most recent version of this toy used vinyl bricks, with softer, rounded edges. The original Block City shipped in a tube, with cardboard roofs that were almost impossible for a kid to uncurl. Brick City shipped in a flat box, so the provided cardboard roofs worked quite well. Best of all might be the model below, where you could construct the roof as well as the walls, ensuring you can build whatever you want to.


Next: A Paper Mystery

Tuesday, April 05, 2016

Collecting -- and collecting information 24

Putting together information from first-hand sources can be challenging. But it can also be fun. And sometimes it's taken me in umexpected directions.

I have a couple of examples of this Haji-brand truck (see Expressing Change in the 0-Gauge Zen Garden). And I've been searching for other variations on this design that Haji offered -- I'll share the results of that search in a future post.

The problem with these inexpensive Japanese toys is that they were always meant to be disposable. Branding is minimal. I assume that was because the Japanese companies who made these toys back in the postwar era were supplying them to American importers, who placed their own brand on the packaging.

And because these were dime store toys, the packaging was seldom saved. So I was very interested to find this example of new-old stock. The truck -- as all Haji vehicles in this series -- is modestly branded "Haji" on the truck body. But the buyer would have thought this was a product of the  Toy Merchandising Corp., as it clearly states on the card.

I wasn't able to find out a lot about the Toy Merchandising Corp. of New York -- save that they ran afoul of the FCC in 1965. As you can see from the ad that they ran in various papers, one could make a fortune stocking "Toy Shop" displays in five-and-dime stores and drug stores. The Toy Merchandising Corp provided the products, and for a small initial investment of $298, you could be in business.


In the complaint, the representation of the business in the ads was brought into question, as well as the earning potential. According to the complaint, "it is impossible for a distributor to make a profit from the initial purchase of the respondent's products."

What I found most interesting was that there seemed to be a some bait and switch going on. Such as:
"Samples of products shown to prospective distributors were indicative of quality or value of the products which would appear on racks or available for placement." And most telling: "Respondents' products were of domestic manufacture."

As the complaint states, "In most instances respondents failed to clearly and conspicuously disclose to prospective purchasers that a substantial amount of their merchandise was of foreign origin."

Like the Haji truck. There's nothing on the packaging that indicates the toy was made in Japan.

So what happened to the Toy Merchandising Corp.? I'm not sure. An extensive Internet search only turned up their ads in various newspapers of the day -- none of them later than 1965.

Another mystery.

Wednesday, April 11, 2012

Old Fashion Locomotive and Three Carriages

No, the title isn't a typo. As you can see from the photo below, that's exactly the Engrish used on this Japanese toy. The Old Fashion is another childhood toy I recently unearthed. This one, as I recall, was used as a decoration on a birthday cake. (click on images to enlarge)

The importer's label lower right reads "Shackman, New York, N.Y."
 A cheap Japanese toy for the day, I'm still impressed with the overall build quality. The pieces are metal, and are fairly heavy. The wheels all roll freely, and the hooks are thick enough that they don't bent easily (which is probably why they aren't broken).


I've seen similar choking hazard-sized Japanese trains made a few years later, before they switched exclusively to plastic. The metal on those later models were so thin that parts sometimes snapped off in transit from Japan.

Not this one, though. Small, inexpensive, but still built a little better than it had to be. I'm glad we kept it!


(The label on the box says "Shackman, New York." I wonder if it's the same as Shackman Stores?)

Tuesday, April 10, 2012

Build a Skyscraper

I recently reclaimed another toy I had as a child. The Build a Skyscraper set is a building toy that was made sometime in the early 1960's. There's no manufacturer information at all on the packaging, instructions, or the blocks themselves. Just a note (in a bad translation) that ti was made in "Western Germany."


As you can see, the set's pretty small -- and entirely self-contained. In addition to providing a variety of blocks to make one very elaborate or several simple city structures, you also get pieces to make a bridge, and three autos.

The set assembled -- just like the box art!

The original price on the bottom is marked 50 cents. I've seen them on eBay for about $30.00, which seems about right. The blocks aren't precisely cut, and the windows aren't printed exactly center -- so this isn't the highest level of German toy manufacturing.

Or I could build one of these other designs.

Still, there's a certain charm about the set, especially when I put the pieces together. I just need to be sure to assemble them on a perfectly flat surface, though. Because, as you can see from the photo below, those blocks weren't cut exactly square!

Or just create something on my own. Beep, beep!

Monday, February 06, 2012

The Other Side of the Badge

We're helping my Dad clean out his attic, and in the process we're unearthing some long-forgotten artifacts. For the most part, they're items that any normal family would have thrown away long ago. But in a way, I'm kind of glad we didn't.

One of the things we found this time was a giant (3"W x 4"H) toy police badge. It's a pretty odd item.

First off, it's outsized even for an adult. It must have just about covered my chest back in the day (I think I was about five or six).

Second, of course, it's something that could no longer be sold. A single piece of stamped metal with sharp pointy edges a child's toy? What were parents thinking?

Third -- and most interesting to me -- is what's on the reverse side. Clearly this badge was stamped from a can of peaches. How cheap can you get?

But there's a little more to it than that.

Consider: you can't just run an old can through the stamper. It would crush the can flat and you'd have two layers of metal, one with a good impression, the other not -- and they'd be difficult to pull apart. The crumpling would also chip the painted label (and it's not).

So the metal was flat to begin with. But it was also printed with the peaches label. So where did it come from? Was the Japanese metal can company making these badges on the side, using overruns and scraps? Or were said overruns and scraps sold to a third-party manufacturer?

I have no idea. But I think I'll hold onto this oddity, at least for a little while longer.

Thursday, December 22, 2011

Elmar Memories

 In a recent visit to my dad, he unearthed yet another artifact from my childhood -- an Elmar toy locomotive.

This was a premium that one could get by sending off Kellogg's cereal boxtops -- which we did. It was billed as a "Jet Drive Whistle Loco," a title that definitely overpromised.

Basically, you fit an inflated balloon over the smokestack. As it deflated, some of the air escaped through a slot on the top of the boiler, creating a train whistle. Most of the air went out an opening in the back, making the "jet drive" that pushed the engine along.

There were two things I remembered about this toy.
  1. It looked pretty good.
  2. It never worked very well.

Fast forward forty years, and I once again have the Elmar loco in my possession. After giving it a good cleaning, I  gave it a try. I have two thoughts about the toy.
  1. It still looks pretty good.
  2. It still doesn't work very well.
It's said that nostalgia colors our memories, making them at odds with the reality of the time. Not it this case. The good and the bad aspects of this inexpensive little toy is exactly as I remembered it.

Still, it looks pretty good sitting on my desk. Thanks, Dad!

Sunday, December 11, 2011

Clackety-Clack Train

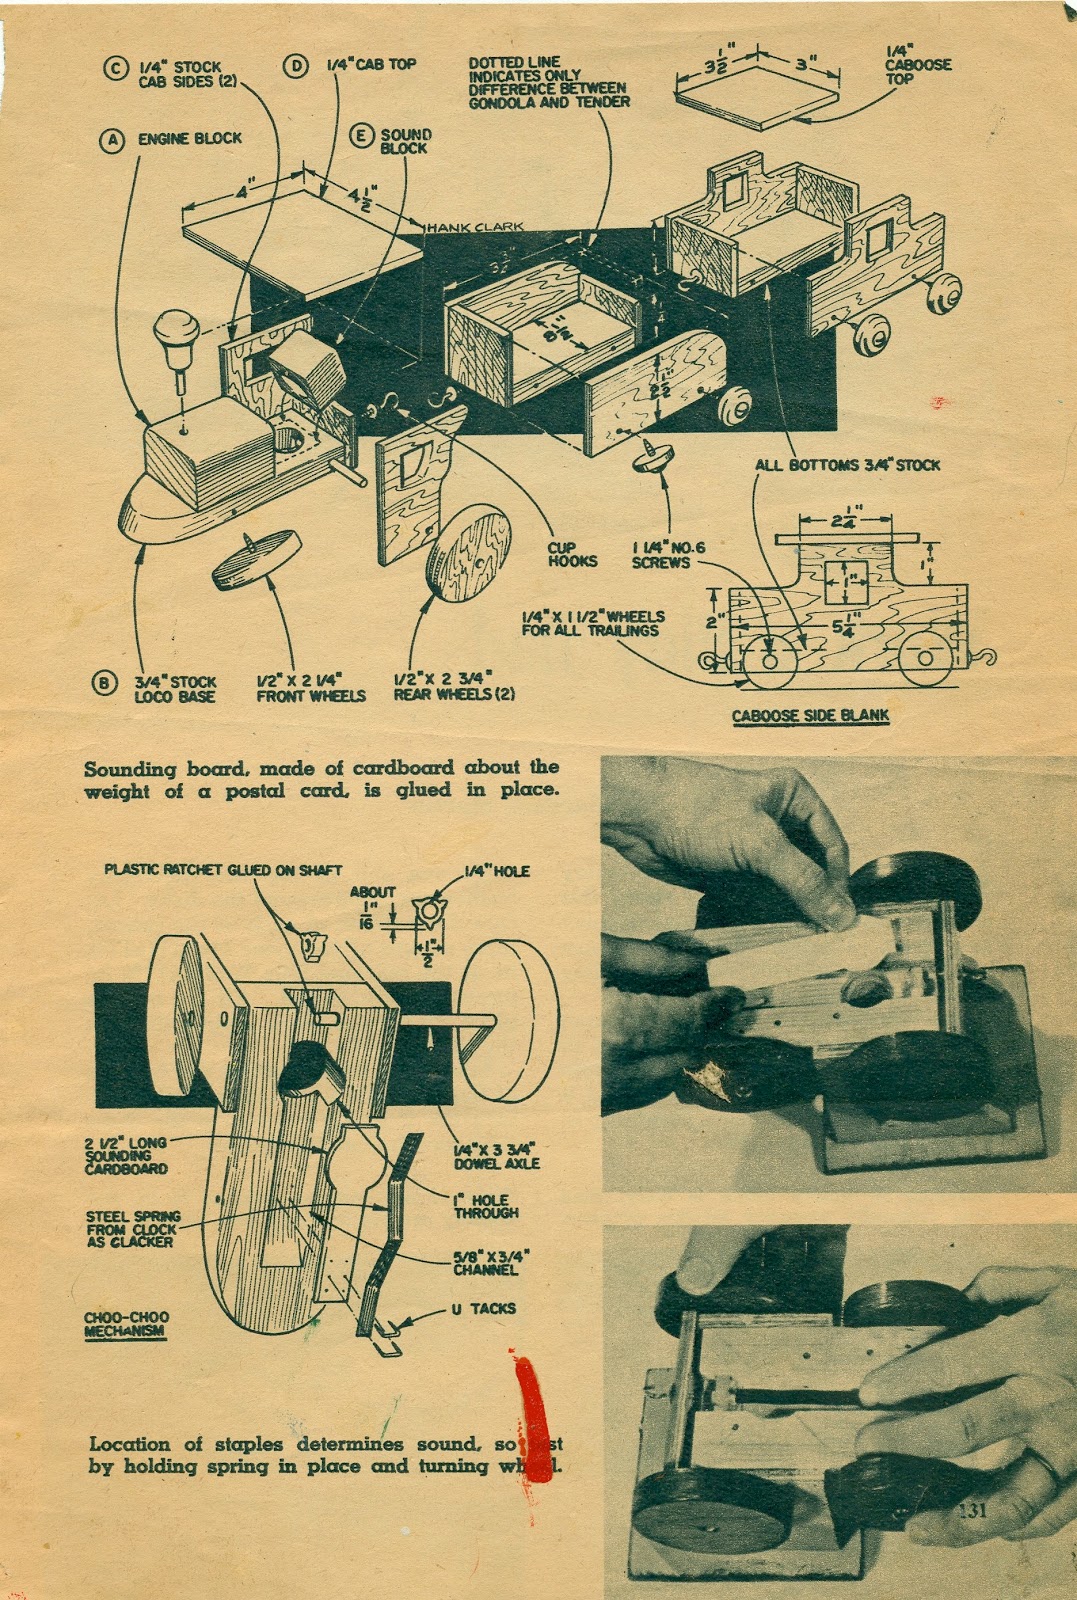
One of the new decorations this year is anything but new. It's a wooden toy train made by my grandfather. Recently my dad ran across the original plans Grandpa used from a handyman magazine in 1957.

What's interesting is what differences there are between the magazine plans and the final process.

First take a quick looks at the plans (click on the images to enlarge).


As you can see, there are some minor changes -- the car is a little shorter than the plan, and the tender is (mercifully) turned the right way. Note the smokestack.


The directions call for a turned dowel, but Grandpa didn't have a lathe. So instead, he used the handle from an old rubber stamp.

And finally, for reasons unknown, rather than a metal clacker, Grandpa used a stiff piece of cardboard.


Still, as a home-made toy it worked fine. I remember pulling it along behind me as it clacked away. It's good to have it back, and nice to know the story behind it.